Welcome Everybody! Today, We will learn about the Planting Process of White Cabbage!

Young White Cabbage
Seeding Process:
1. Before planting the seed, soak the seed in warm water for 2-10 minutes, then cool down the seed itself for 5-10 minutes.
2. Also soak the seed with Organic Pesticides.
3. Soak the seed again with Tricoderma, PGPR() and an organic mixture for 10-12 hours. The composition of all three solutions should be in a 1: 1: 1 ratio.
4. Then proceed to cool down until a white liquid is gone.
Seedling Process:
1. Two weeks before Seedling, prepare the seedling media which is a combination of sand, compost, dirt and charcoal husks.
Mix the mixture until it is homogeneous in a 1:1:1:1 ratio.
Spray the media with Organic Pesticides for 3 days.
Put the Tricoderma, PGPR and organic mixture together with the mixture above for two weeks.
2. Prepare the tray and put the homogeneus media.
Plant the seeds in the tray with preferably one or two seeds for a five centimetre diameter.
Close the tray with a soft media.
Be sure to water the plants routinely but not excessively.
Protect the seedling tray with a screen.
Ground Treatment:
Ground Treatment is also done two weeks before planting.
1. The ground dirt is mixed with a rotary tractor.
2. Then create a 120 centimetre square to lay it out on.
3. Also spread the composite using 10 kilograms of compost for every meter.
4. Spray the pesor on the mixture, let it stay for three days, then mix it with the Tricoderma mixture.
Planting:
1. The seed is planted when the seed already has one or two leaves coming out or after 14 days of seedling.
2. The optimal range for planting one seed is 40 centimetres x 60 centimetres.
3. After that spray the plants with a Vegetative POC.

White Cabbage at 15 Days
Growth of Plant:
1. Water the plants daily when small. Although when it is larger it should be watered two or three times daily. it is recommended to use a hose for planting.
2. Spray the plants weekly with the Vegetative POC with a ratio of 10cc for every litre of water. This is to get rid of the pests.
3. If the plant is near the seedbed already has weeds, clean the weeds by taking out the grass so that no roots grow further.
4. For this Specific Growth Type, Plant MerryGold Plants in the vicinity to ensure that no Insects come near the Plants.
Harvest:
1. Between twenty-five and thirty-five days the plant can be harvested. The more days it stays in the ground the larger the plant itself.
2. Harvesting is simple, just take the roots out of the ground and it is done!
3. Take the Roots of the Plant out together with the Plant when Harvesting
This Week, Alongside the Daikon Radish, We will also be learning about another Vegetable that is similar with Daikon in colour, although a whole different Vegetable in itself!

Fun Facts about White Cabbage:
1. White Cabbage is one of the Oldest Vegetables known to man, being discovered in the 1600s.
2. Cabbage as a Plant can have three different Colours which are White, Purple and Green.
3. Cabbage is also very low in calories, meaning people on a diet regime should definitely start eating more White Cabbage!
4. The Largest Dish of Cabbage was created in Macedonia weighing a total of 544Kg.
5. There are many types of Cabbage such as Bok Choi, Napa Cabbage and Brussels Sprouts.
6. Cabbage Juice is also thought to be very healthy for curing Stomach and Intestinal Issues.

Nutritional Facts of White Cabbage:
White Cabbage is very high in Vitamins A, C and Vitamin D. White Cabbage also has a large amount of Carbohydrates making it a very filling Vegetable. White Cabbage also has no Cholesterol at all and is very high in Calcium.
Resources:
1."Nutrition Facts." And
Analysis for Cabbage, Raw. N.p., n.d. Web. 11 Mar. 2016.
2. "8 Interesting Facts about
Cabbage." Top Food Facts. N.p., 31 Jan. 2013. Web. 11 Mar. 2016.
1
Welcome Back Everybody! This Week , the first Ingredient we are learning about will be the Daikon Radish.
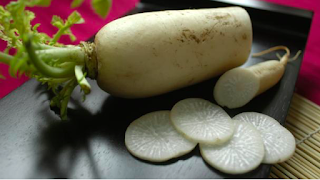
Fun Facts about Daikon:
1. Daikon is actually part of the Radish Family of Vegetables.
2. Daikon originated in Japan and the word Daikon means "Great Root" in Japanese.
3. Daikon is also a very versatile Ingredient, as it can be used to make chips, be used in a slaw and can be added to numerous meat dishes.
4. The part of the Daikon Radish that is eaten is mostly the Root of the Plant.
5. Each Root can have a length of up to 10 centimetres.
6. Japan produces 90% of the whole world's Daikon.

Nutritional Facts of Daikon:
Daikon is a Vegetable which can help Respiratory and Breathing Issues. It is also thought that Daikon can help Prevent Cancer and also Support Human Bones. Daikon Radishes can also keep our kidneys healthy and make Human Skin look younger.
Resources:
1. "Daikon Radish." Information,
Recipes and Facts. N.p., n.d. Web. 11 Mar. 2016.
2."Health Benefits of Daikon | Organic Facts." Organic Facts. N.p., 22 Feb. 2015. Web. 11 Mar. 2016.
Welcome Back to the Second Post of the week! In this Post, We will learn on How to Grow Broccoli! Broccoli belongs in the same family as Cauliflower, so the Growth Process is Identical!
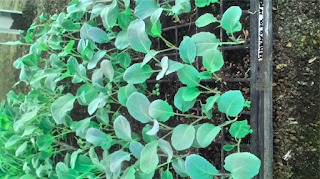
Broccoli in the Seeding Process
Seeding Process:
1. Before planting the seed, soak the seed in warm water for 2-10 minutes, then cool down the seed itself for 5-10 minutes.
2. Also soak the seed with Organic Pesticides.
3. Soak the seed again with Tricoderma, PGPR() and an organic mixture for 10-12 hours. The composition of all three solutions should be in a 1: 1: 1 ratio.
4. Then proceed to cool down until a white liquid is gone.
Seedling Process:
1. Two weeks before Seedling, prepare the seedling media which is a combination of sand, compost, dirt and charcoal husks.
Mix the mixture until it is homogeneous in a 1:1:1:1 ratio.
Spray the media with Organic Pesticides for 3 days.
Put the Tricoderma, PGPR and organic mixture together with the mixture above for two weeks.
2. Prepare the tray and put the homogeneus media.
Plant the seeds in the tray with preferably one or two seeds for a five centimetre diameter.
Close the tray with a soft media.
Be sure to water the plants routinely but not excessively.
Protect the seedling tray with a screen.
Ground Treatment:
Ground Treatment is also done two weeks before planting.
1. The ground dirt is mixed with a rotary tractor.
2. Then create a 120 centimetre square to lay it out on.
3. Also spread the composite using 10 kilograms of compost for every meter.
4. Spray the pesor on the mixture, let it stay for three days, then mix it with the Tricoderma mixture.
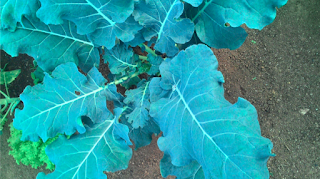
Young Broccoli
Planting:
1. The seed is planted when the seed already has one or two leaves coming out or after 14 days of seedling.
2. The optimal range for planting one seed is 40 centimetres x 60 centimetres.
3. After that spray the plants with a Vegetative POC.
Growth of Plant:
1. Water the plants daily when small. Although when it is larger it should be watered two or three times daily. it is recommended to use a hose for planting.
2. Spray the plants weekly with the Vegetative POC with a ratio of 10cc for every litre of water. This is to get rid of the pests.
3. If the plant is near the seedbed already has weeds, clean the weeds by taking out the grass so that no roots grow further.
4. For this Specific Growth Type, Plant MerryGold Plants in the vicinity to ensure that no Insects come near the Plants.

Broccoli Ready to Harvest!
Harvest:
1. Between twenty-five and thirty-five days the plant can be harvested. The more days it stays in the ground the larger the plant itself.
2. Harvesting is simple, just take the roots out of the ground and it is done!
3. Take the Roots of the Plant out together with the Plant when Harvesting.


